Let’s be honest GIS editing can be a complex task and there are many tools and methods dedicated to this in software like ArcMap GIS. That said a forester often just wants to update a stand boundary, split a stand or map out a few gaps from a recent survey. In this example just wanted to touch on a workflow to map out some non-stocked gaps in the stand. So let’s assume the GIS patch layers already exist, stand history is already in GeoMaster and all you want to do is add 2 or 3 un-stocked gaps from a recent aerial photo or GPS survey.
 Figure 1 – Workflow of mapping out gaps in GeoMaster
STEP 1 Create some Gaps!
Using a temporary remapping layer, add some polygons to represent your gaps (Edit Layer Features). This is shown in Figure 2 and once you have all your polygon gaps as a single multipart polygon, then save edits.
USER TIP: it makes it easier if you create multi-part polygon when you have many gaps in a single stand. So as you sketch just right click at end of each polygon and select finish part, and when finished select finish sketch (a shortcut to the Finish Part command is to hold down the SHIFT key and click). This eliminates the need to merge these later.
USER TIP: you would normally do this from an aerial photo, select GeoMaster View > Edit Mode as this gives you a good transparent view of the patch layer and aerial photo together.
 Figure 2 creating gaps and saving a multi-part polygon
STEP 2 Clip the Gaps in the Patch layer
Atlas have added a tool into the edit toolbar in ArcMap that simplifies this step. Ensure you are connected to GeoMaster (Figure 3).
A. Select “Make Patch Layer Selectable”
B. Select “Make Patch Layer Editable” from the GeoMaster toolbar
C. Then select the patch/stand we wish to clip the gaps into.
D. Select “Cut Polygons” icon from editor toolbar which will enable the Atlas “Select feature to Cut By” and you can use this to select the gaps polygons created earlier and thus a patch subdivide dialog is presented confirming this event to be recorded in GeoMaster.
 Figure 3 clipping the stand to the new gap polygons
E. Enter a good comment on why these patches have been removed e.g. “these areas did not survive due to a dense rocky soil type – do not replant in this area” Selecting OK in the Patch Subdivide dialog, provides a confirmation and the patch layer now includes these new patches (Figure 4).
 Figure 4 confirmation of addition of patch subdivide event.
F. You can now stop editing the latch layer.
STEP 3 Update Patch Class
We now can update these new patches to “Non Productive” (or Landbank if to be replanted).
A.Select the Gaps, and from the GeoMaster toolbar in ArcMap goto Utilities > Change Patch Class
 Figure 5 selecting to change patch class with gaps already highlighted
B. You will be prompted with this dialog to change patch class. Just double click on the first date field and this will complete the initial dates for you (you can set these different as needed). Enter a relevant event class and new patch type.
 Figure 6 set change patch class dialog.
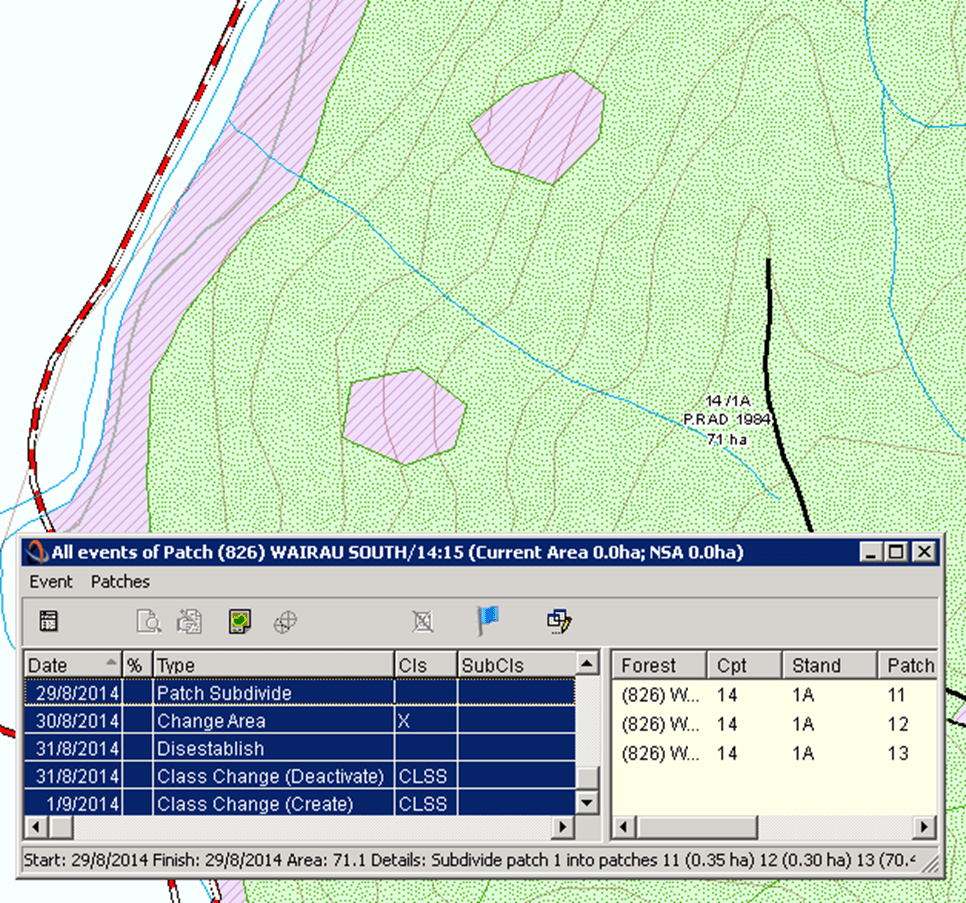
Once complete you will see the patches take the correct Symbology and if you select them to see the full patch history.
 Figure 7 Patch history of this new non-productive patch.
Even if you are not the one doing the mapping, hopefully this has helped in understanding the tools used and built into GeoMaster.
If you need help in doing this feel free to contact our support team.
